If you’re reading this, you’ve probably just signed up (or are interested in) a phishing campaign from us! We’re about to start creating an email template and a landing page, custom made to try and trick your staff into giving us their credentials. But before then, there’s some preparation to do.
Allowlisting our phishing campaign
Why allowlist?
In a real phishing attack, of course you wouldn’t allowlist the attacker’s campaign! So why do it for ours? Remember, the goal of performing a simulated phishing campaign is to test the security awareness of your employees; not to test the effectiveness of your email gateway.
Allowlist with Microsoft 365 / Exchange Online
Microsoft 365 allows for third-party (that’s us 🐺) phishing simulations. Here’s what you need to do:
- With a Global Admin or Exchange Admin account, go to https://admin.cloud.microsoft/exchange?ref=#/transportrules.
- Select Add a rule > Create a new rule
-
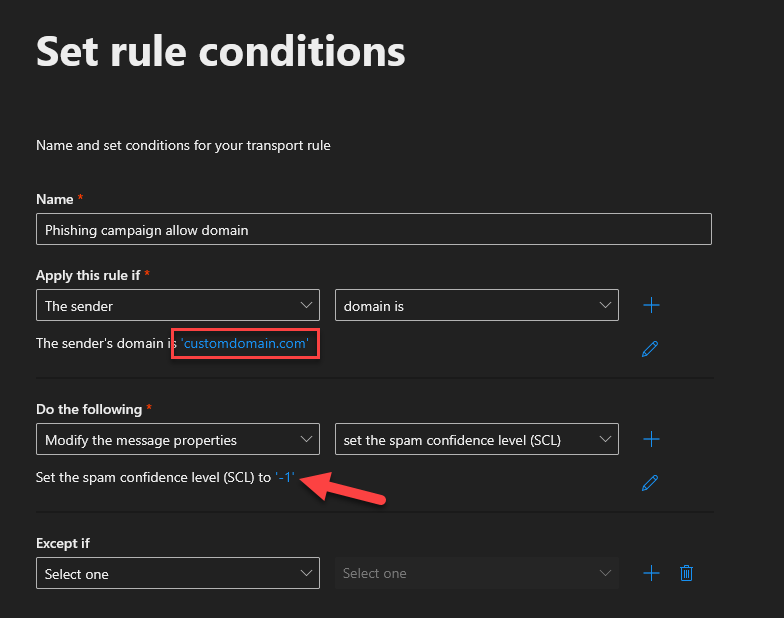
Fill in the fields as follows and press Next:
⚠️ The phishing domain will be given to you by the consultant.
You can set the spam confidence level to ‘-1’ by selecting Bypass spam filter from the dropdown.
- Optionally set the rule settings as desired or leave as default.
- Press Next, then Finish.
If you’re using a different email gateway or an email filter, they likely have their own documentation for how to allowlist a domain.
Pre-launch: Testing the campaign
With your help, we will test the campaign end-to-end twice:
- Once right after we’ve created and configured it; and
- Right before the it goes live.
We’ll send you an email and ask that you progress all the way through, entering fake credentials (or real ones; your choice).
If there are issues, we may need to delay launching the campaign.
During the campaign
Observe how your staff react to the campaign, and write down some of their reactions. They could be fun to discuss later on. If you’d like, you can also let us know! We love hearing the results (read chaos) of our work.
Post-campaign
After about 24 hours, most people would have had a chance to interact with the campaign somehow. Word of mouth spreads quickly and your more alert staff members have probably told others about the phishing attack (which is good). Time to call it a day.
With testing finished, it’s important to remove the allowlisting you added before.
Internal debrief
Social engineering is a sensitive topic. While computers don’t mind being hacked, people can have a negative reaction to falling for a phishing campaign. It’s vital that you reassure anyone who feels bad and show the campaign in a positive light, thanking people for participating in improving the company’s security.
In our experience, shaming or reprimanding people who fell for the phish makes your cyber security worse. It stops people from reporting incidents and causes people to have a negative outlook on cyber security training. We don’t want to work with companies who misuse our services like this and will refuse to perform further phishing exercises if we find any abuse.
An all-hands, open discussion about the campaign can be extremely beneficial. Ask (ahead of time) if people who were phished want to share their thought process for why it worked on them. Similarly, ask those who saw through the deception to explain what tipped them off.
Lastly, ask those who were phished to change their passwords. It’s just good practice. 🙂